
OnX Hunt Tips: How To Use OnX To Stalk Bedded Mule Deer
“You don’t get close to a mature buck by accident.”
When it comes to stalking a bedded buck, every decision matters. The wind, the terrain, the buck’s awareness—it all plays into whether you get a shot or walk away empty-handed. Over the years, I’ve learned that OnX Hunt isn’t just a helpful app—it’s my most valuable hunting partner. It doesn’t replace instincts or woodsmanship, but it turns my mental plan into a precise, trackable strategy I can trust.
Why I Trust OnX Before I Ever Step Into the Field
Before my boots hit the dirt, I make sure my OnX offline maps are downloaded. Not just my main hunting area, but also any backup zones I might need if conditions change. I’ve been miles deep in the backcountry when my phone service dropped, and without offline maps, you’re hunting blind. With them, every ridge, draw, and contour line is at my fingertips. That peace of mind allows me to focus entirely on the hunt.
Downloading maps isn’t a glamorous part of hunting prep, but it’s one of the smartest moves you can make. I treat it like packing my bow—it’s not optional.
Locking In the Buck’s Location
The moment I glass a buck in a stalkable position, my thought process changes. I immediately mark my glassing point. That spot might produce again, and it’s a location I want to remember for years to come.
From there, I range the buck and transfer that exact distance into OnX using the rangefinder tool. You can find this feature by going into compass mode then tapping the rangefinder icon on the right hand side of the screen. This tool lets you slide the on-screen crosshairs up and down to measure distance to different features in your line of sight. If you want absolute precision, you can input the exact yardage from your handheld rangefinder directly into OnX by tapping on the yardage value, and the crosshairs will jump to that exact spot on the map. Once you have the crosshairs positioned where the buck is bedded, you can drop a pin to lock in his location.
But here’s where you need to be careful. Even if you enter a perfect 800-yard reading, you can still be off if you’re not perfectly aligned. OnX will rotate with you, so if your phone is angled slightly off from the buck’s direction, the pin placement can drift. That’s why it’s critical to face directly toward the buck when you line it up in rangefinder mode. Use the directional guide lines that appear on your screen to make sure you’re aiming exactly where you ranged him from the glassing point. One thing you can do if you are having trouble lining it up you can lock the rotate feature. In the bottom right corner there is a padlock icon. Tap that and you then have control over the rotation and zoom on the screen. You can then manually direct the line to get the crosshairs lined up precisely.
Once I’ve done this, I double-check the pin’s position by comparing it with landmarks I can see both in person and on the map—things like large rock outcroppings, tree lines, or distinctive terrain features. Only when I’m confident it’s right do I lock it in and move forward.
This step may sound simple, but it’s the difference between finding that buck again or wandering in circles. Once you move, the terrain changes. Rocks and brush start to blend together. Without a precise and verified pin, that bed you spotted from a mile away can disappear.

Piecing Together the Perfect Route
Once the buck’s location is locked in, I start studying the map like I’m solving a puzzle. I measure distances from his bed to potential shooting spots and start imagining my approach. I use topo lines to see where ridges can hide me, benches that allow a low-profile sneak, or small rises that break my silhouette. Sometimes, the straight path isn’t the smart path. I’ll take a long loop if it means staying downwind and unseen.
Landmarks matter. I’ll mentally note and often mark saddles, benches, or lone boulders that I can use as navigational anchors. They’re the invisible handrails that guide me when I’m in the thick of the stalk.
Making the Move
When I leave the glassing point, I start a track in OnX. This isn’t just for the stats—it’s my safety net. It’s my breadcrumb trail if I need to retrace my steps in the dark. Early in the stalk, I move with purpose, checking my map when I need to confirm I’m on line with my plan.
Once I get close enough that silence matters more than speed, I drop my pack and mark its location. It might sound excessive, but in the adrenaline rush of a stalk, gear can vanish into the landscape. A pin ensures I’ll find it quickly when the hunt’s over.
The Final Push
With my pack stashed, I start a fresh track for the last yards. This doesn’t necessarily help in the moment—it’s for me to analyze later. Did I choose the best approach? Could I have used terrain better? These lessons compound over time.
As I close the gap, I keep my phone handy but only check it if I lose my bearings. If I can see my destination, the phone goes away and it’s all about slow, deliberate movement. My senses are tuned in to every shift in wind, every flick of an ear through the sage.

The Details That Make the Difference
Over the years, a few small habits—most of them built around OnX—have made my stalks smoother and more effective:
Color-code your pins – I have dozens of pins scattered across my maps: water sources, glassing points, bedding areas, campsites. During a stalk, I don’t want to sift through all that. Assigning a specific color to stalk-related pins makes them pop instantly. In the chaos of a stalk, shaving even seconds off your map reading can be the difference between catching a buck in his bed or watching him bound away.
Mark your shot location – The moment an arrow leaves my bow, I mark that spot. Even if the shot looks perfect, tracking a wounded deer can be challenging. Having a precise starting point lets you line up blood trails accurately, understand the angle of the shot, and keep your search methodical rather than scattered.
Know your tools before the season – I can’t stress this enough. Playing with the line tool, rangefinder tool, and tracking features at home ensures that when I’m in the field, I’m not wasting precious time fumbling through menus. When seconds count, you want these tools to be muscle memory.
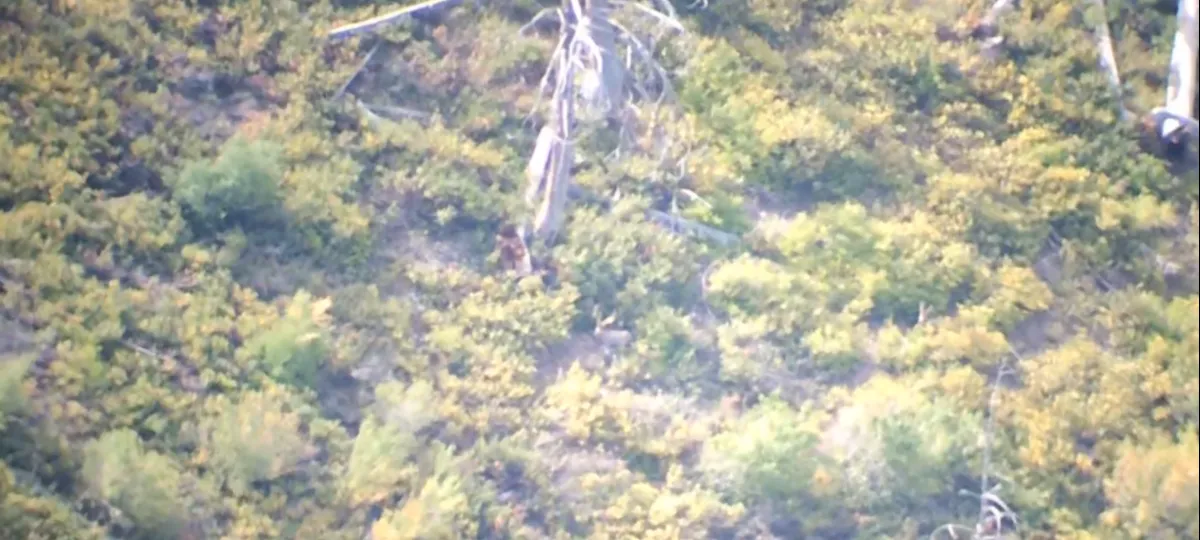
Take photos of the landscape and bedded buck location – This isn’t about OnX, but it’s every bit as important. From your glassing point, snap a picture that includes both the buck’s bed and the surrounding terrain. Take a wide shot so you can reference trees, rocks, shadows—anything that can help orient you later. The photo gives you a real-world visual that pairs with your digital pin, making it easier to re-locate the exact spot once you’re over there.
Why This System Works
OnX doesn’t do the hunting for me—but it removes uncertainty. It confirms my route, keeps me oriented, and makes my movements deliberate. It transforms a mental sketch into a tangible plan. From spotting that bedded buck to closing the final yards, every decision I make is reinforced by real, visual data.
When I look back on the hunts where everything came together, OnX wasn’t just part of my strategy—it was the backbone. And when a plan falls apart, it’s the same tool that helps me understand why, so I’m sharper the next time I find myself looking down at a bedded buck through my glass.